


1. 서론
- 서버에 관심이 많고, 개발 및 서비스 용도로 자체적으로 서버를 구축하여 사용해오고 있다. (※ 서버 히스토리 참고 : https://taking.kr/about)
- 개인적으로 현재 블로그를 포함한 서비스는 Docker를 통해 서비스를 하고 있으나, Kubernetes로의 전환을 생각하고 있었고, 여러 방법을 테스트하면서 겪은 정보와 결과를 공유하고자 글을 작성한다.
- 이외의 kubernetes 관련 내용은 Taking Gist에서 정리하고 있다.
2. 본론
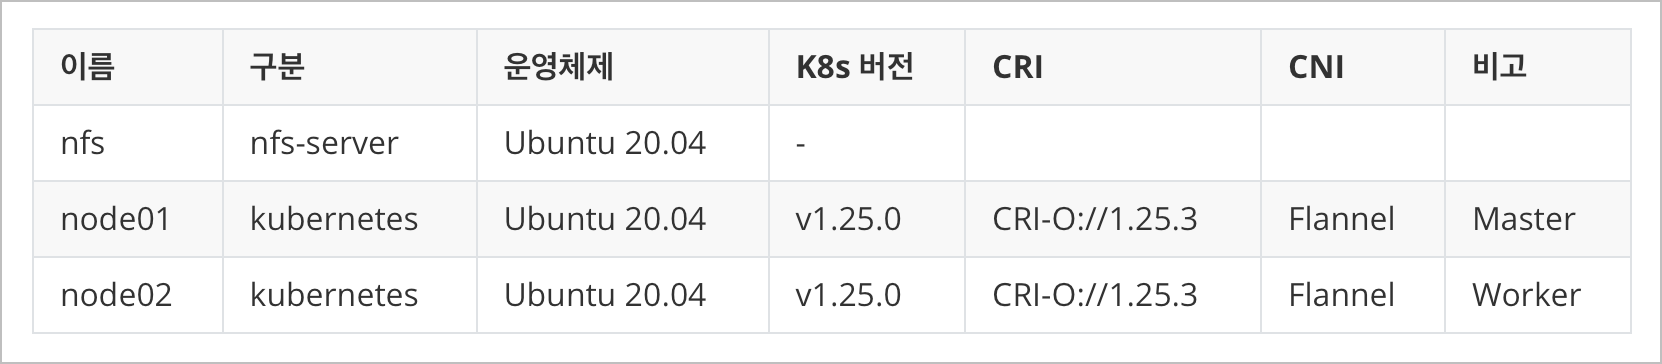
2.1. 환경구축
- 개인 서버 내 3개의 VM을 하단과 같이 구성하고 기본적인 설정을 끝냄
2.2. 전제조건
- (필수) Kubernetes v1.25.0 설치(https://gist.github.com/taking/22af888e010f7084d920ca1ecec10085)
- (옵션) metllb-system v0.12.1 (https://gist.github.com/taking/5f604675399fc2caa70ba56bc89966b7)
- (필수) Velero 1.11.0 (https://gist.github.com/taking/3b2e511dbde79b9d9ab361f9fcbd7003)
- (필수) MinIO RELEASE.2023-07-18T17-49-40Z in docker (https://gist.github.com/taking/2a3187314de95fde16f7382a3509aa7c)
: 개인적으로 DB 및 Object Storage는 Docker로 빼놓았으며, 추후 외부 서버가 생기면 이중화를 통해 kubernetes로 이전할 계획이다. Docker 데이터는 duplicati를 통해 구글 드라이브로 자동 백업이 진행된다.
Step 1.1. Velero 설치 (Helm)
- 우선 기본적으로 Minio를 설치하여 velero bucket 생성 및 accesskey, secretkey를 발급받은 후 진행한다.
helm repo add vmware-tanzu https://vmware-tanzu.github.io/helm-charts/
helm repo update vmware-tanzu
Helm Add & Update
- minio object storage을 사용하여 백업을 진행하기 위해 velero-plugin-for-aws를 추가해준다.
- PV,PVC 백업을 위해 defaultVolumesToFsBackup 옵션과 deployNodeAgent 옵션을 True로 설정했다.
- backupStorageLocation 설정에 minio 주소, bucket 명, Region 명을 입력해주고, Credentials 설정을 통해 minio 접근을 위한 access Key, secretKey를 입력해준다.
cat <<EOF > velero-values.yaml
initContainers:
  - name: velero-plugin-for-aws
    image: velero/velero-plugin-for-aws:v1.7.0
    imagePullPolicy: IfNotPresent
    volumeMounts:
      - mountPath: /target
        name: plugins

configuration:
  defaultVolumesToFsBackup: true
  backupStorageLocation:
  - name: default
    provider: aws
    bucket: velero
    accessMode: ReadWrite
    default: true
    config:
      region: us-east-1
      s3ForcePathStyle: true
      s3Url: http://192.168.0.101:9000
      publicUrl: http://192.168.0.101:9000
  volumeSnapshotLocation:
  - name: aws
    provider: aws
    config:
      region: us-east-1

credentials:
  useSecret: true
  secretContents:
    cloud: |
      [default]
      aws_access_key_id = {your-minio-access-key}
      aws_secret_access_key = {your-minio-secret-key}
deployNodeAgent: true
EOF
velero-values.yaml (External)
- helm으로 velero를 설치해준다. 네임스페이스는 velero 이며, 위에 작성한 velero-values.yaml 내 작성한 설정 값으로 진행된다.
helm upgrade my-velero vmware-tanzu/velero \
  --install \
  --create-namespace \
  --namespace velero \
  -f velero-values.yaml
velero install with HELM
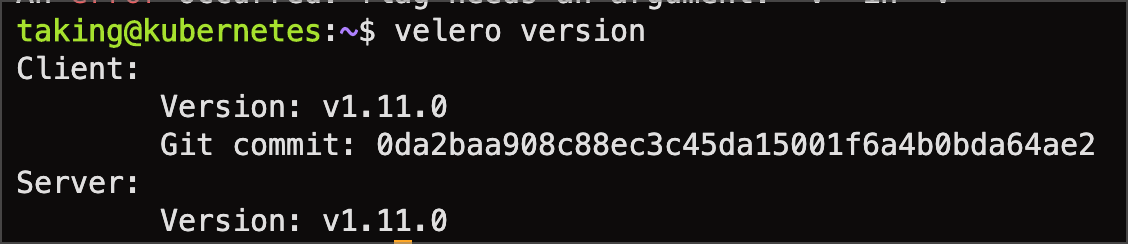
- velero 제어를 위해 cli를 설치해준다. 주의해야할 점은 아래 스크린샷과 같이 server와 client의 버전이 동일해야한다.
wget https://github.com/vmware-tanzu/velero/releases/download/v1.11.0/velero-v1.11.0-linux-amd64.tar.gz
tar xvzf velero-v1.11.0-linux-amd64.tar.gz
sudo mv velero-v1.11.0-linux-amd64/velero /usr/local/bin
rm -rf ./velero-v1.11.0-linux-amd64
velero cli install
- backup-location 이 정상적으로 연결되었는지, 아래의 명령어를 입력하고 PHASE를 확인해본다. Avaiable 이면 정상이다.
velero backup-location getvelero backup-location lists

Step 1.2. Velero 설치 (CLI) (추천)
- 개인적으로 CLI로 설치를 추천한다. 백업 및 복구를 위해서 CLI가 필수인 만큼 helm은 의미가 없어보이기 때문이다. 삭제도 쉬움
velero uninstall
cat <<EOF > credentials-velero
[default]
 aws_access_key_id = {your-minio-access-key}
 aws_secret_access_key = {your-minio-secret-key}
EOF

providerName="aws"
pluginName="velero/velero-plugin-for-aws:v1.7.0"
bucketName="velero"
minioAddress="http://192.168.0.101:9000"

velero install \
 --provider ${providerName} \
 --plugins ${pluginName} \
 --bucket ${bucketName}  \
 --secret-file ./credentials-velero \
 --use-volume-snapshots=true \
 --backup-location-config region=us-east-1,s3ForcePathStyle="true",s3Url=${minioAddress},publicUrl=${minioAddress} \
 --image velero/velero:v1.11.0  \
 --snapshot-location-config region="us-east-1" \
 --use-node-agent \
 --default-volumes-to-fs-backup \
 --wait
velero install with CLI
Step 2. 백업 및 재해복구 시나리오
2.1. nfs-subdir-external-provisioner (실패)
- NFS를 사용하는 만큼 Dynamic Provisioner를 사용하여 진행 및 테스트를 했었다. Velero는 PVC spec.volumeName으로 구분을 하여 백업을 하지만, Dynamic으로 PV,PVC을 자동으로 생성해주기 때문에 velero를 이용하여 백업 및 복구 시 PV,PVC UUID가 재생성되어 기존 백업된 볼륨을 못 찾는 문제가 발생하였다. 하루종일 삽질 결과 실패하였다.

2.2. Static Provisioning with HostPath (반만 성공)
- Kubernetes 서버 내 NFS 폴더를 Mount 한 후, hostpath 로 지정해서 진행해보았다.
- 다들 잘 알겠지만, HostPath의 경우에는 배포된 DataNode 내 HostPath로 진행이되기 때문에 노드 별로 NFS Mount 작업을 진행해줘야한다.

- 우선 테스트를 위해 Static PV,PVC를 아래와 같이 생성해주었다.
- hostpath 이기 때문에 수동으로 필히 해당 폴더를 생성하고 진행해야하는 단점이 존재한다.

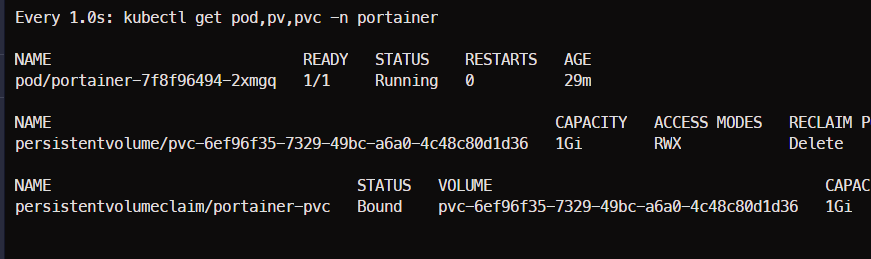
- 테스트를 위해 Portainer를 설치했다.
- hostPath를 위해 Static PV,PVC를 아래와 같이 생성했다.
- 네임스페이스 / PV / PVC 생성
NAME=portainer
HOSTPATH=/volume/1TB_NVME/kubernetes/portainer-pvc
STORAGE_ClASS=manual
STORAGE_CAPACITY=1Gi

cat << EOF | kubectl apply -f -
---
# namespace
---
apiVersion: v1
kind: Namespace
metadata:
  labels:
    component: ${NAME}
    kubernetes.io/metadata.name: ${NAME}
  name: ${NAME}
---
# nfs pv,pvc
---
apiVersion: v1
kind: PersistentVolume
metadata:
  name: ${NAME}-pv
  namespace: portainer
spec:
  accessModes:
    - ReadWriteOnce
  capacity:
    storage: ${STORAGE_CAPACITY}
  volumeMode: Filesystem
  persistentVolumeReclaimPolicy: Retain
  hostPath:
    path: ${HOSTPATH}
  storageClassName: ${STORAGE_ClASS}
---
apiVersion: v1
kind: PersistentVolumeClaim
metadata:
  name: ${NAME}-pvc
  namespace: portainer
spec:
  accessModes:
    - ReadWriteOnce
  resources:
    requests:
      storage: ${STORAGE_CAPACITY}
  storageClassName: ${STORAGE_ClASS}
  volumeMode: Filesystem
  volumeName: ${NAME}-pv
EOF
c

- helm을 통해 portainer를 설치한다.
- 네임스페이스는 portainer 그리고 서비스 타입은 NodePort, https 만 사용하기때문에 tls.force는 true, 그리고 개인적으로 라이센스가 있기 때문에 enterpriseEdition.enabled 는 true로 설정했다. true일 경우 EE false일 경우 CE로 설치된다.
- persistence는 자동 생성이 아니라 이미 위와 같이 생성해두었기 때문에 persistence.existingClaim 값은 portainer-pvc로 설정했다.
helm upgrade portainer portainer/portainer \
    --install \
    --create-namespace \
    --namespace portainer \
    --set service.type=NodePort \
    --set enterpriseEdition.enabled=true \
    --set persistence.existingClaim=portainer-pvc \
    --set tls.force=true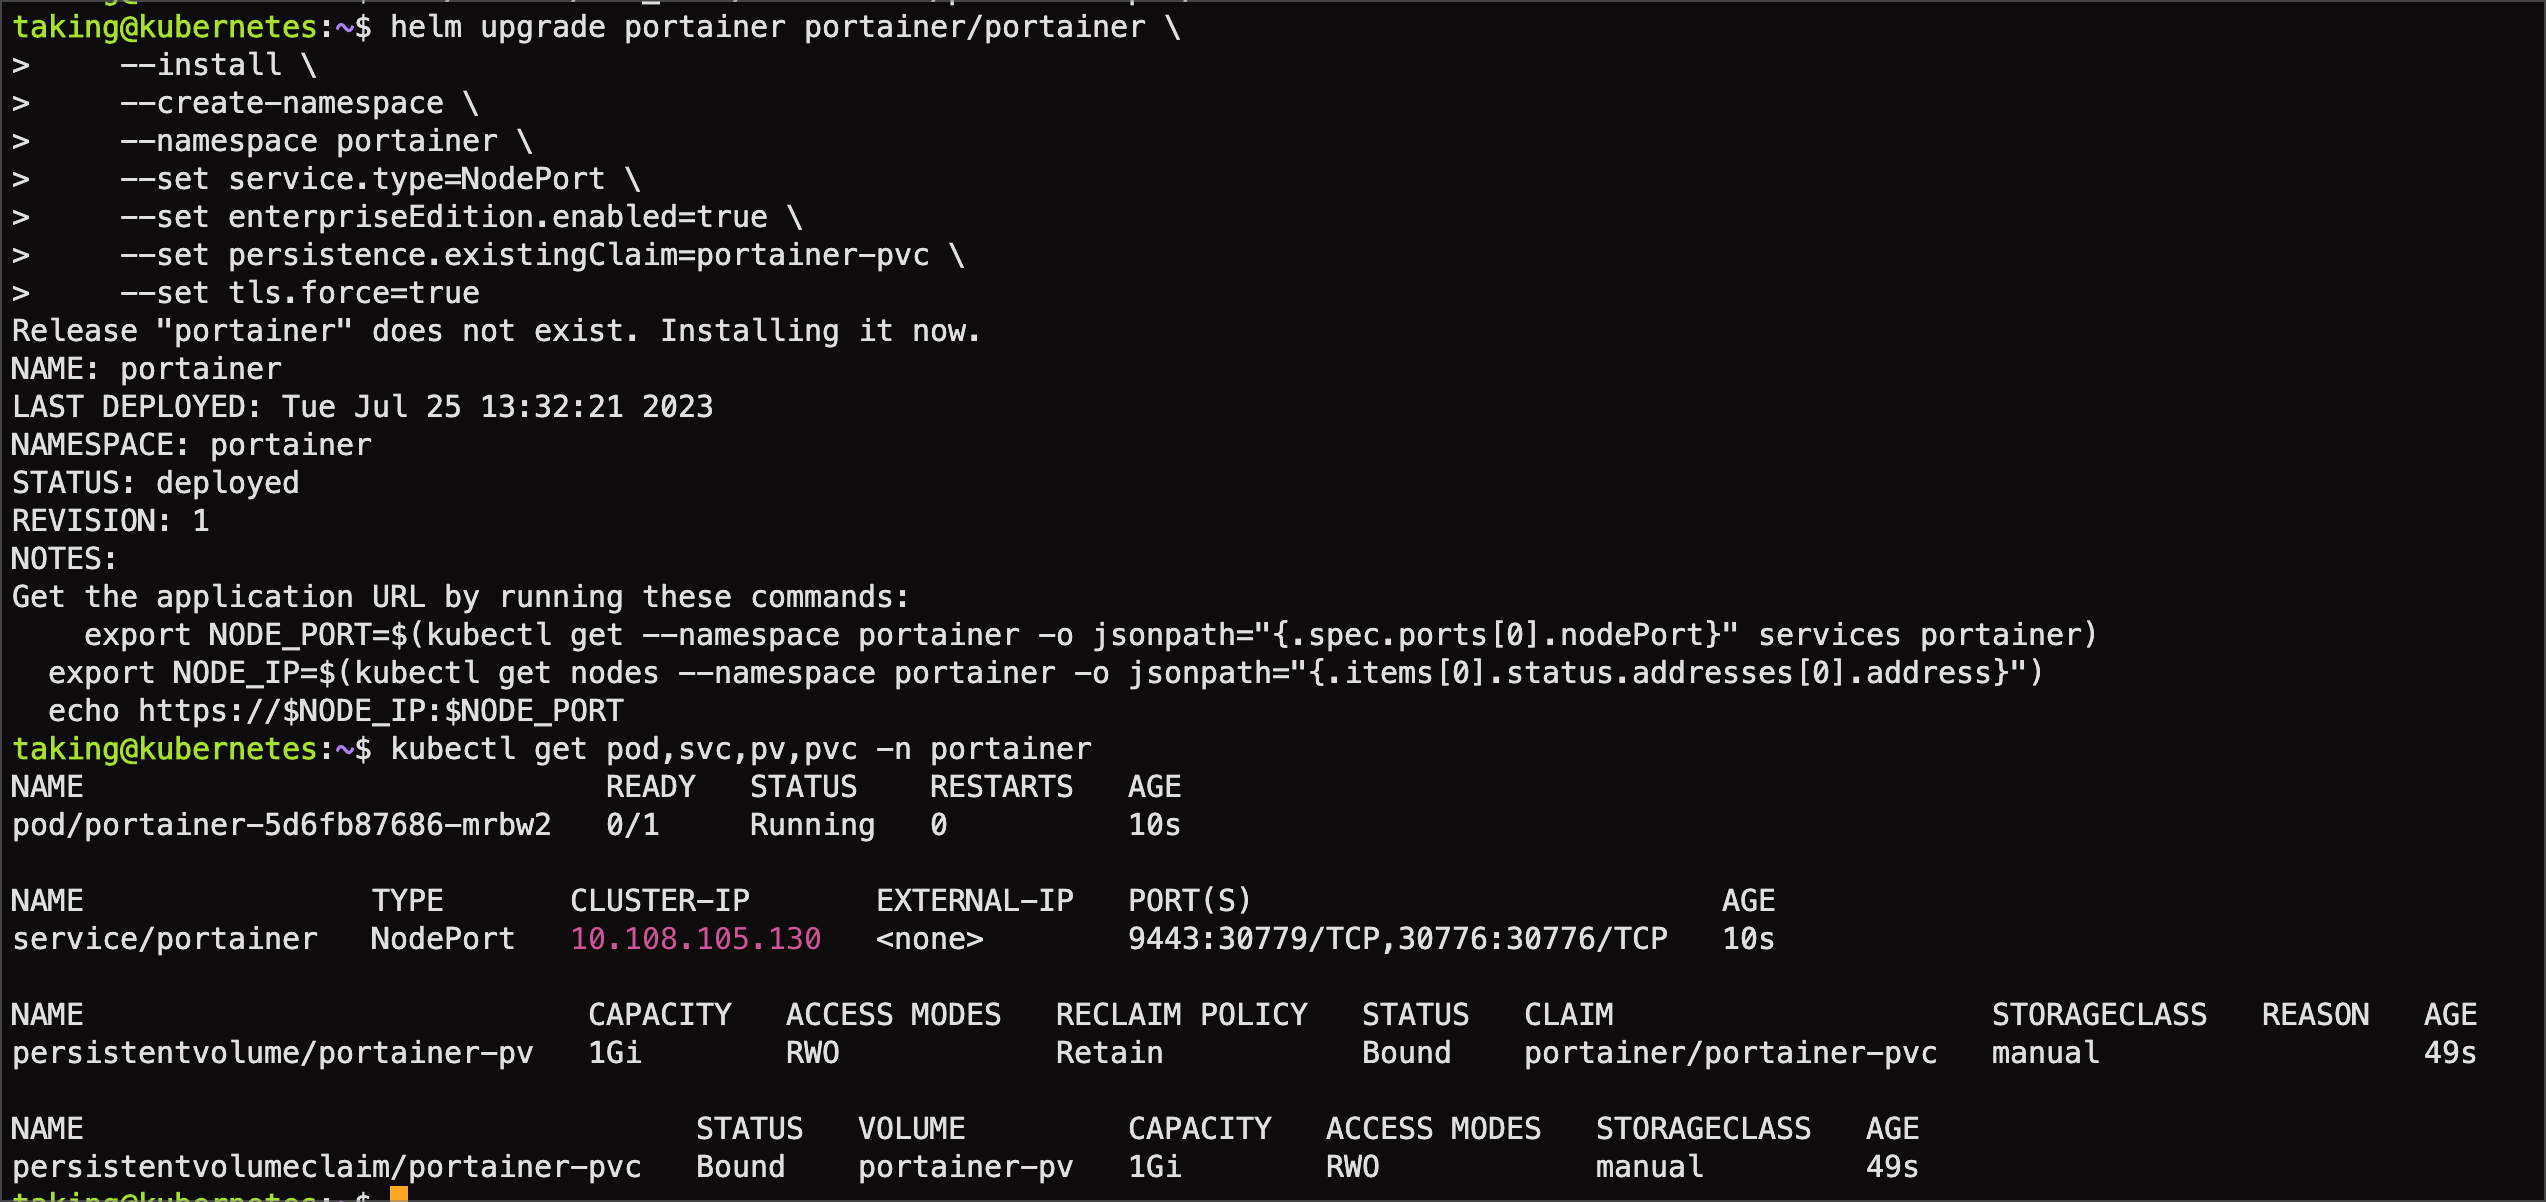
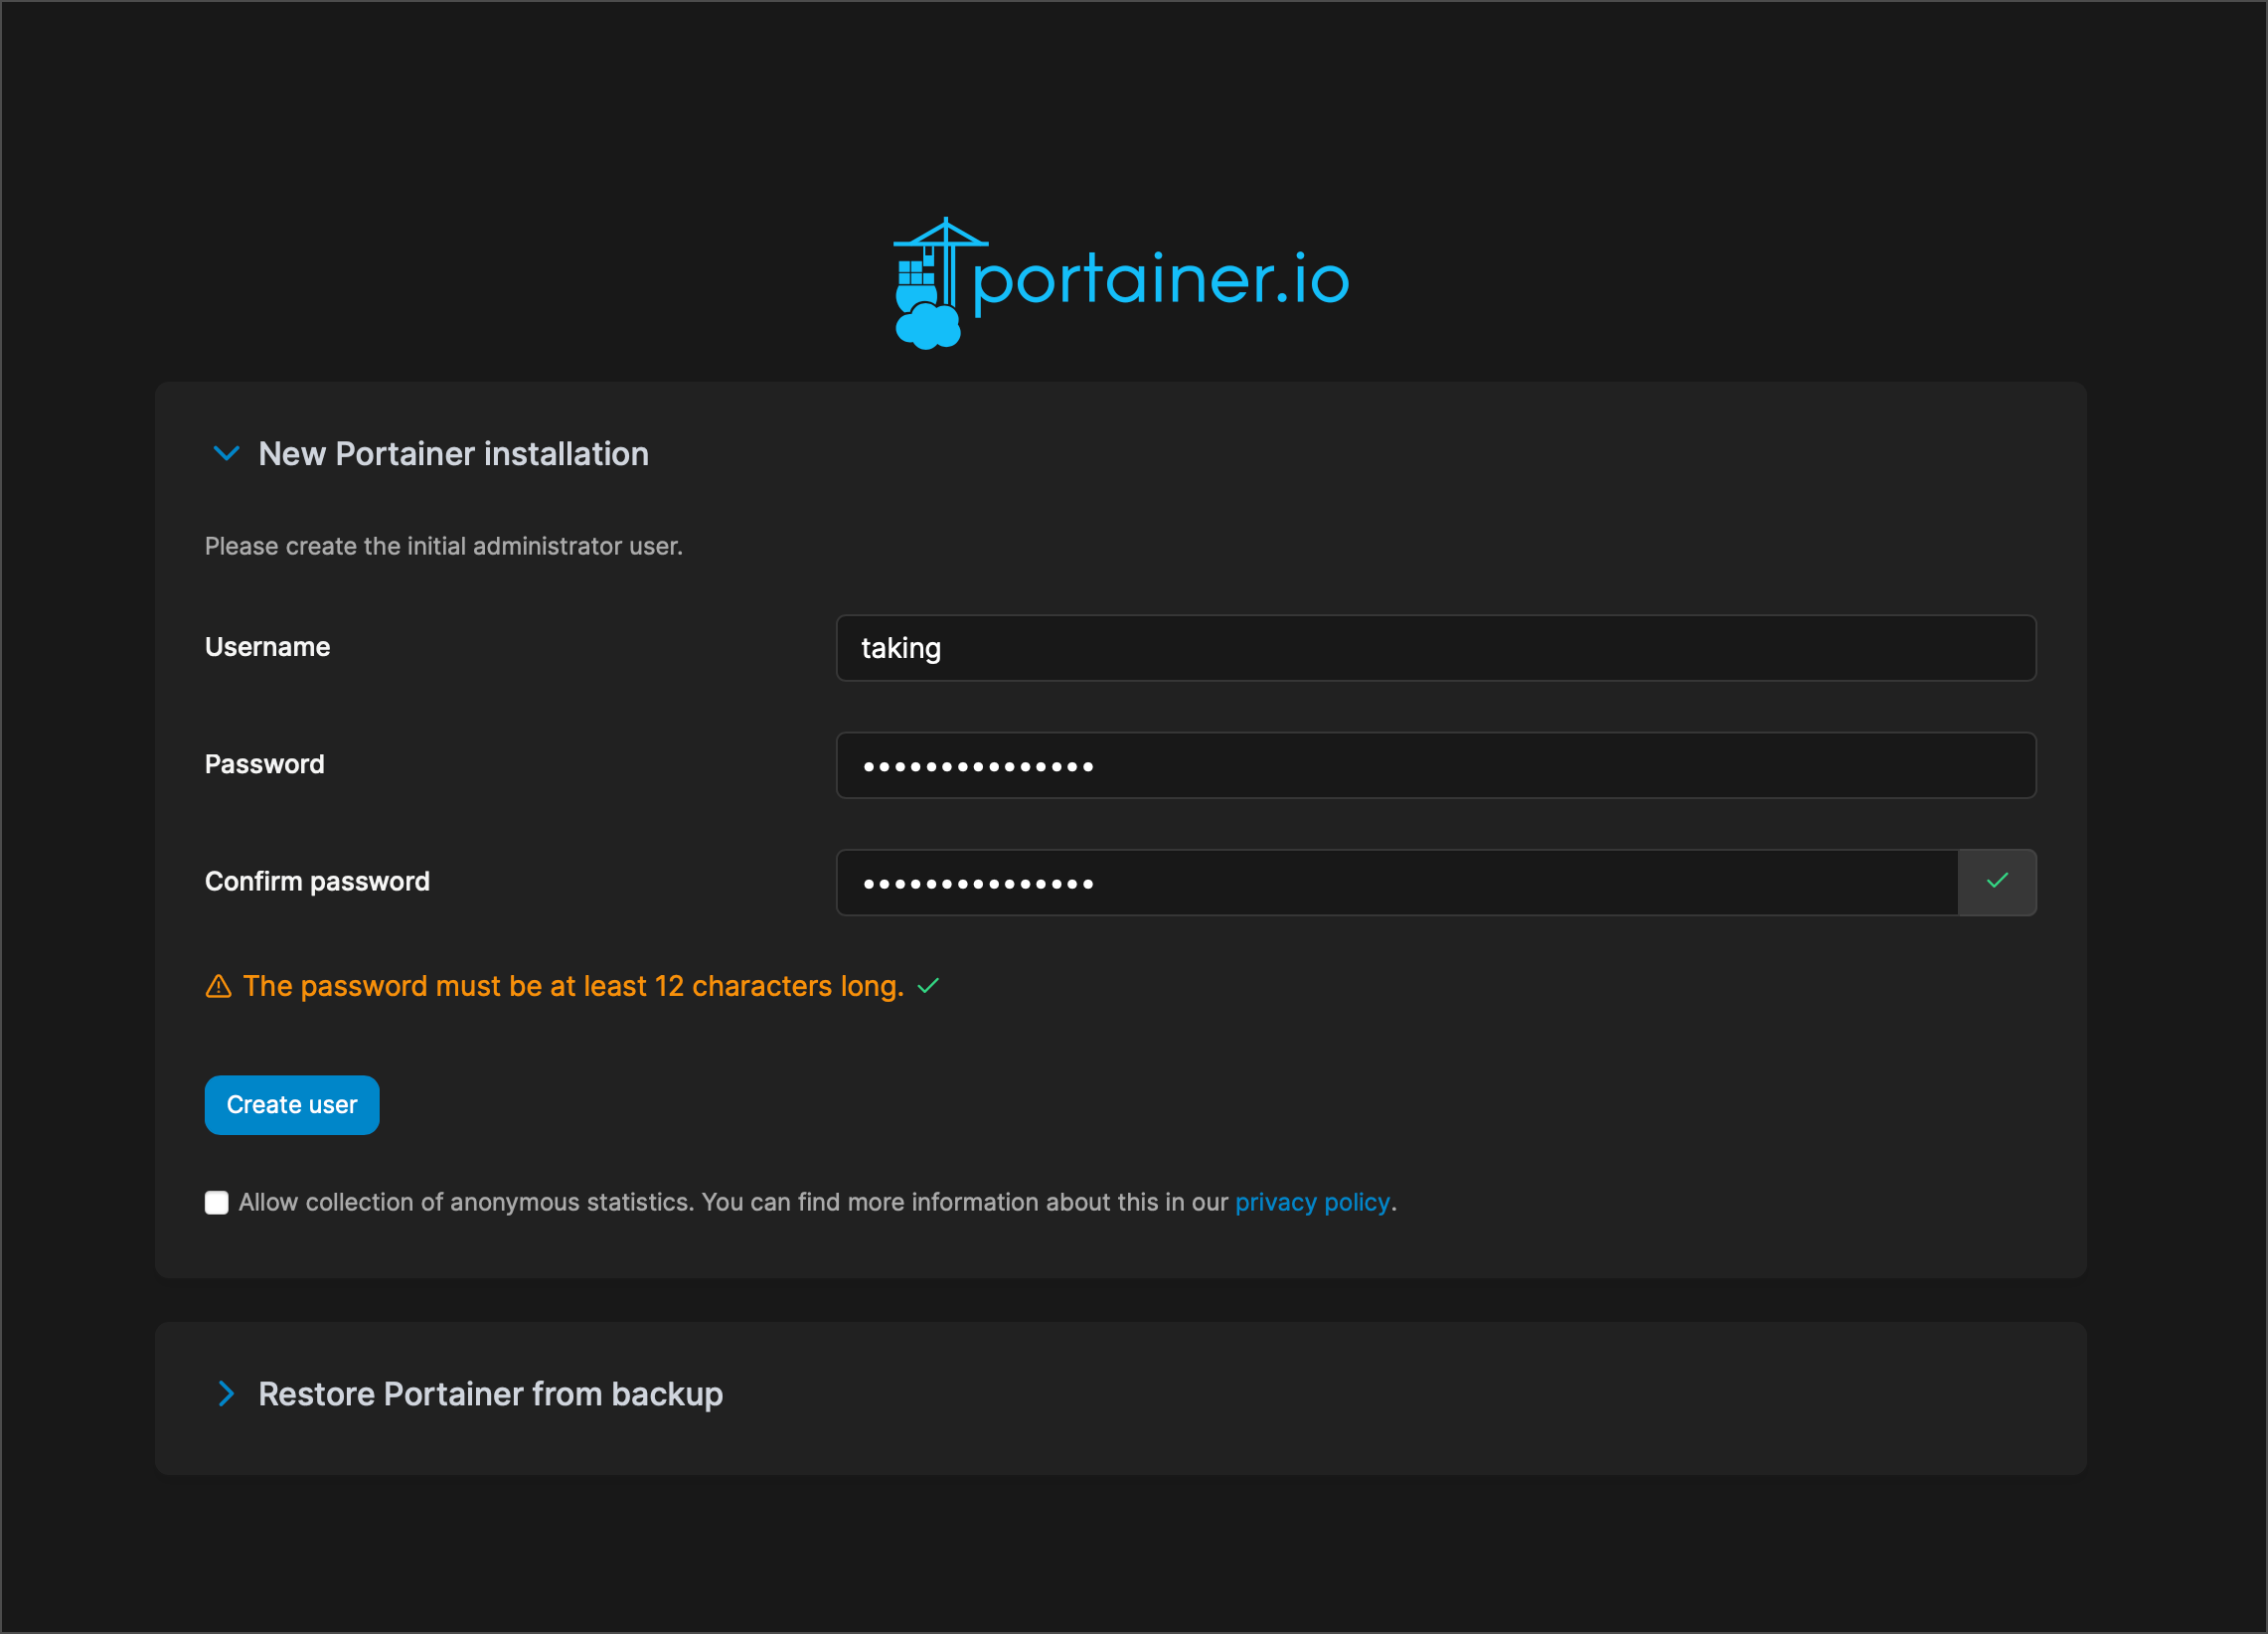
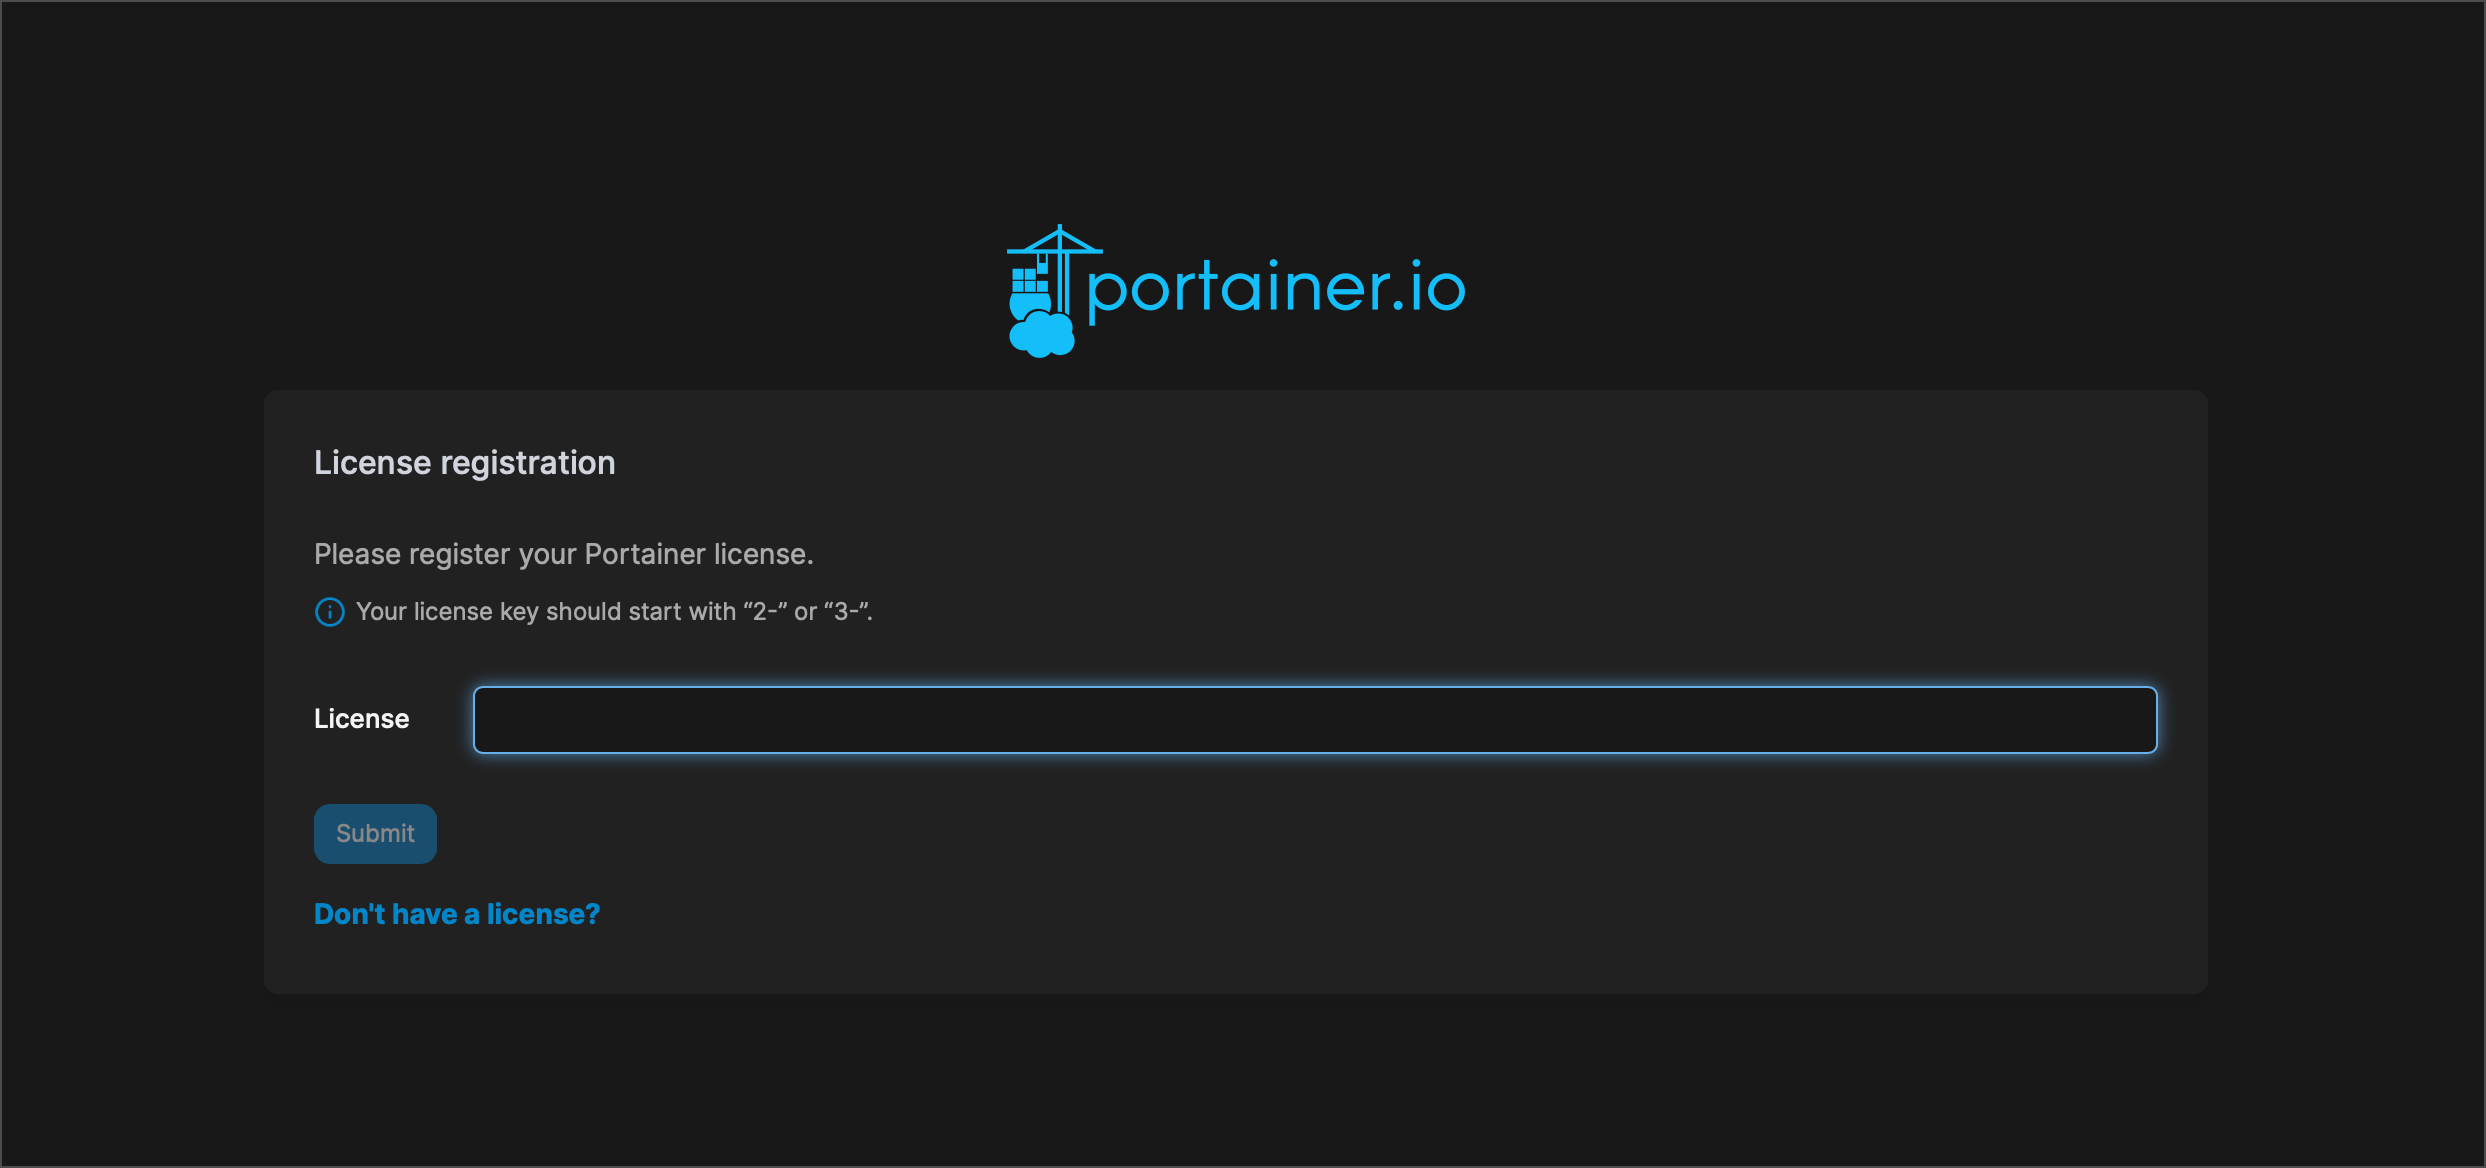
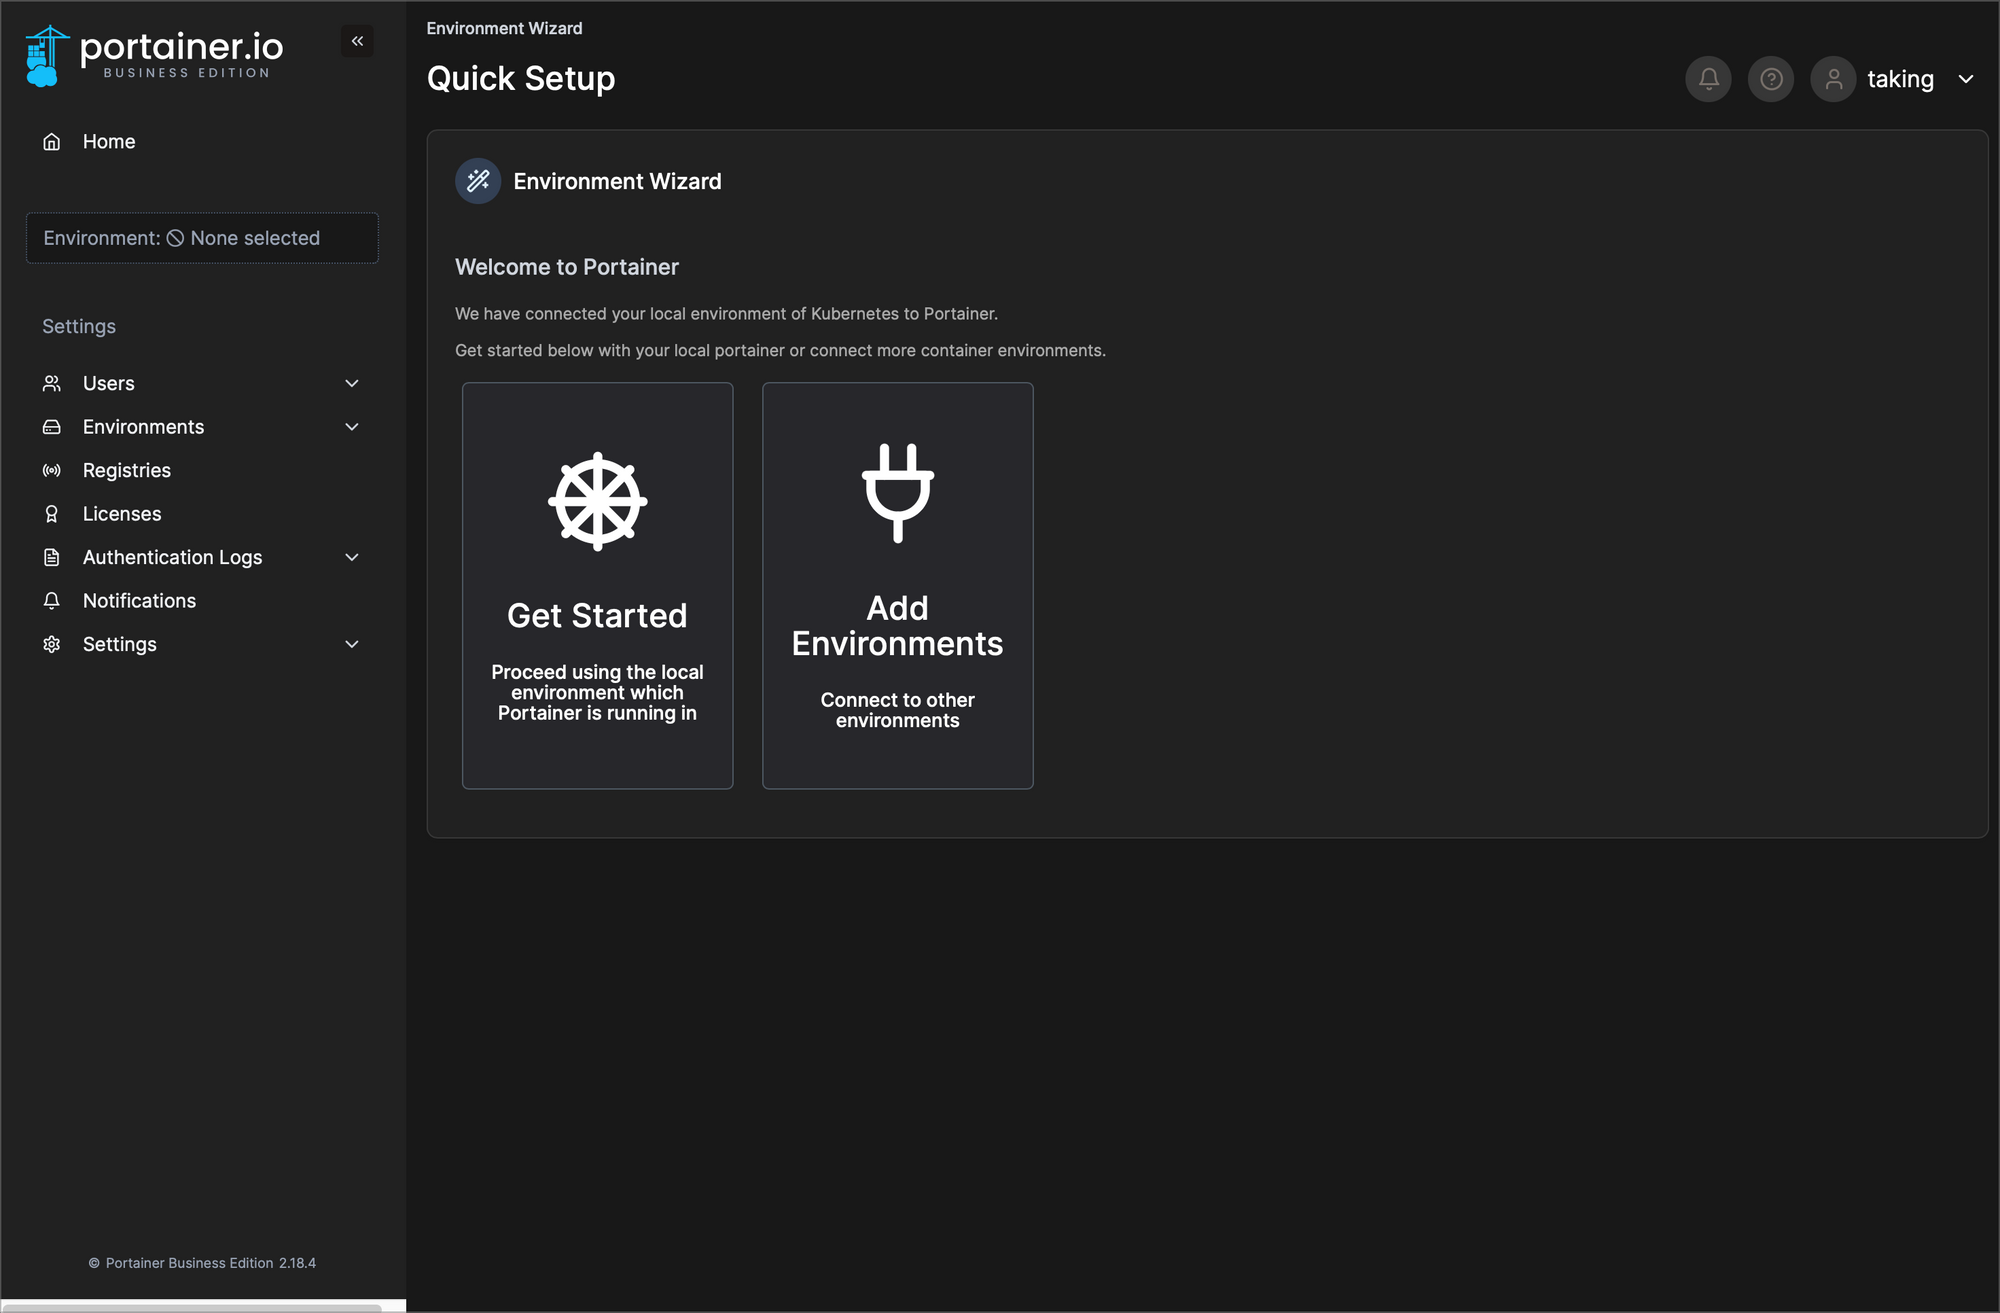
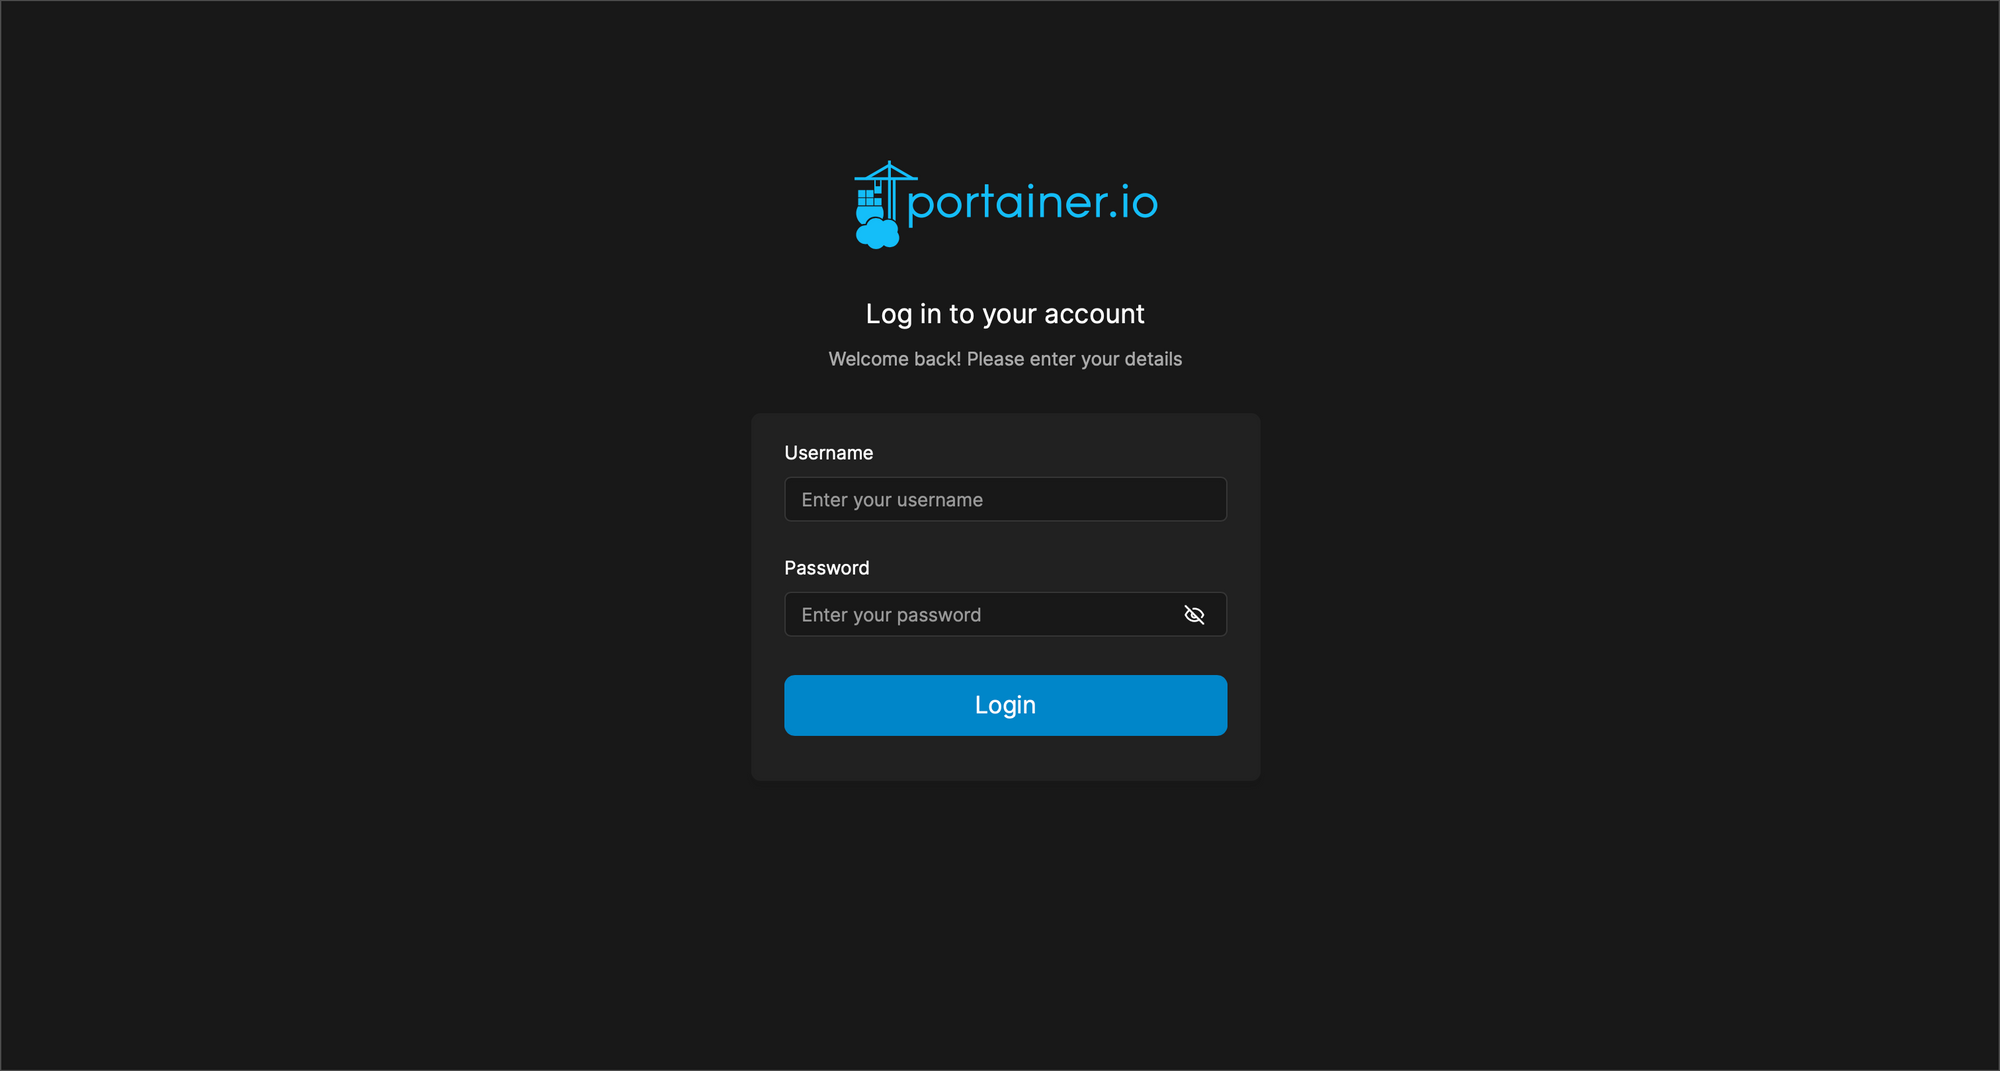
- Portainer 설치 후, 접속하여 계정과 라이센스를 입력하여 데이터를 저장하였다.
- velero cli를 사용하여 backup을 생성해준다.
velero backup create {backupName} --include-namespaces {nameSpaceName}- velero backup describe {backupName}을 통해 백업 정보를 상세히 확인할 수 있다.
- velero backup logs {backupName}을 통해 백업 로그를 상세히 확인할 수 있다.
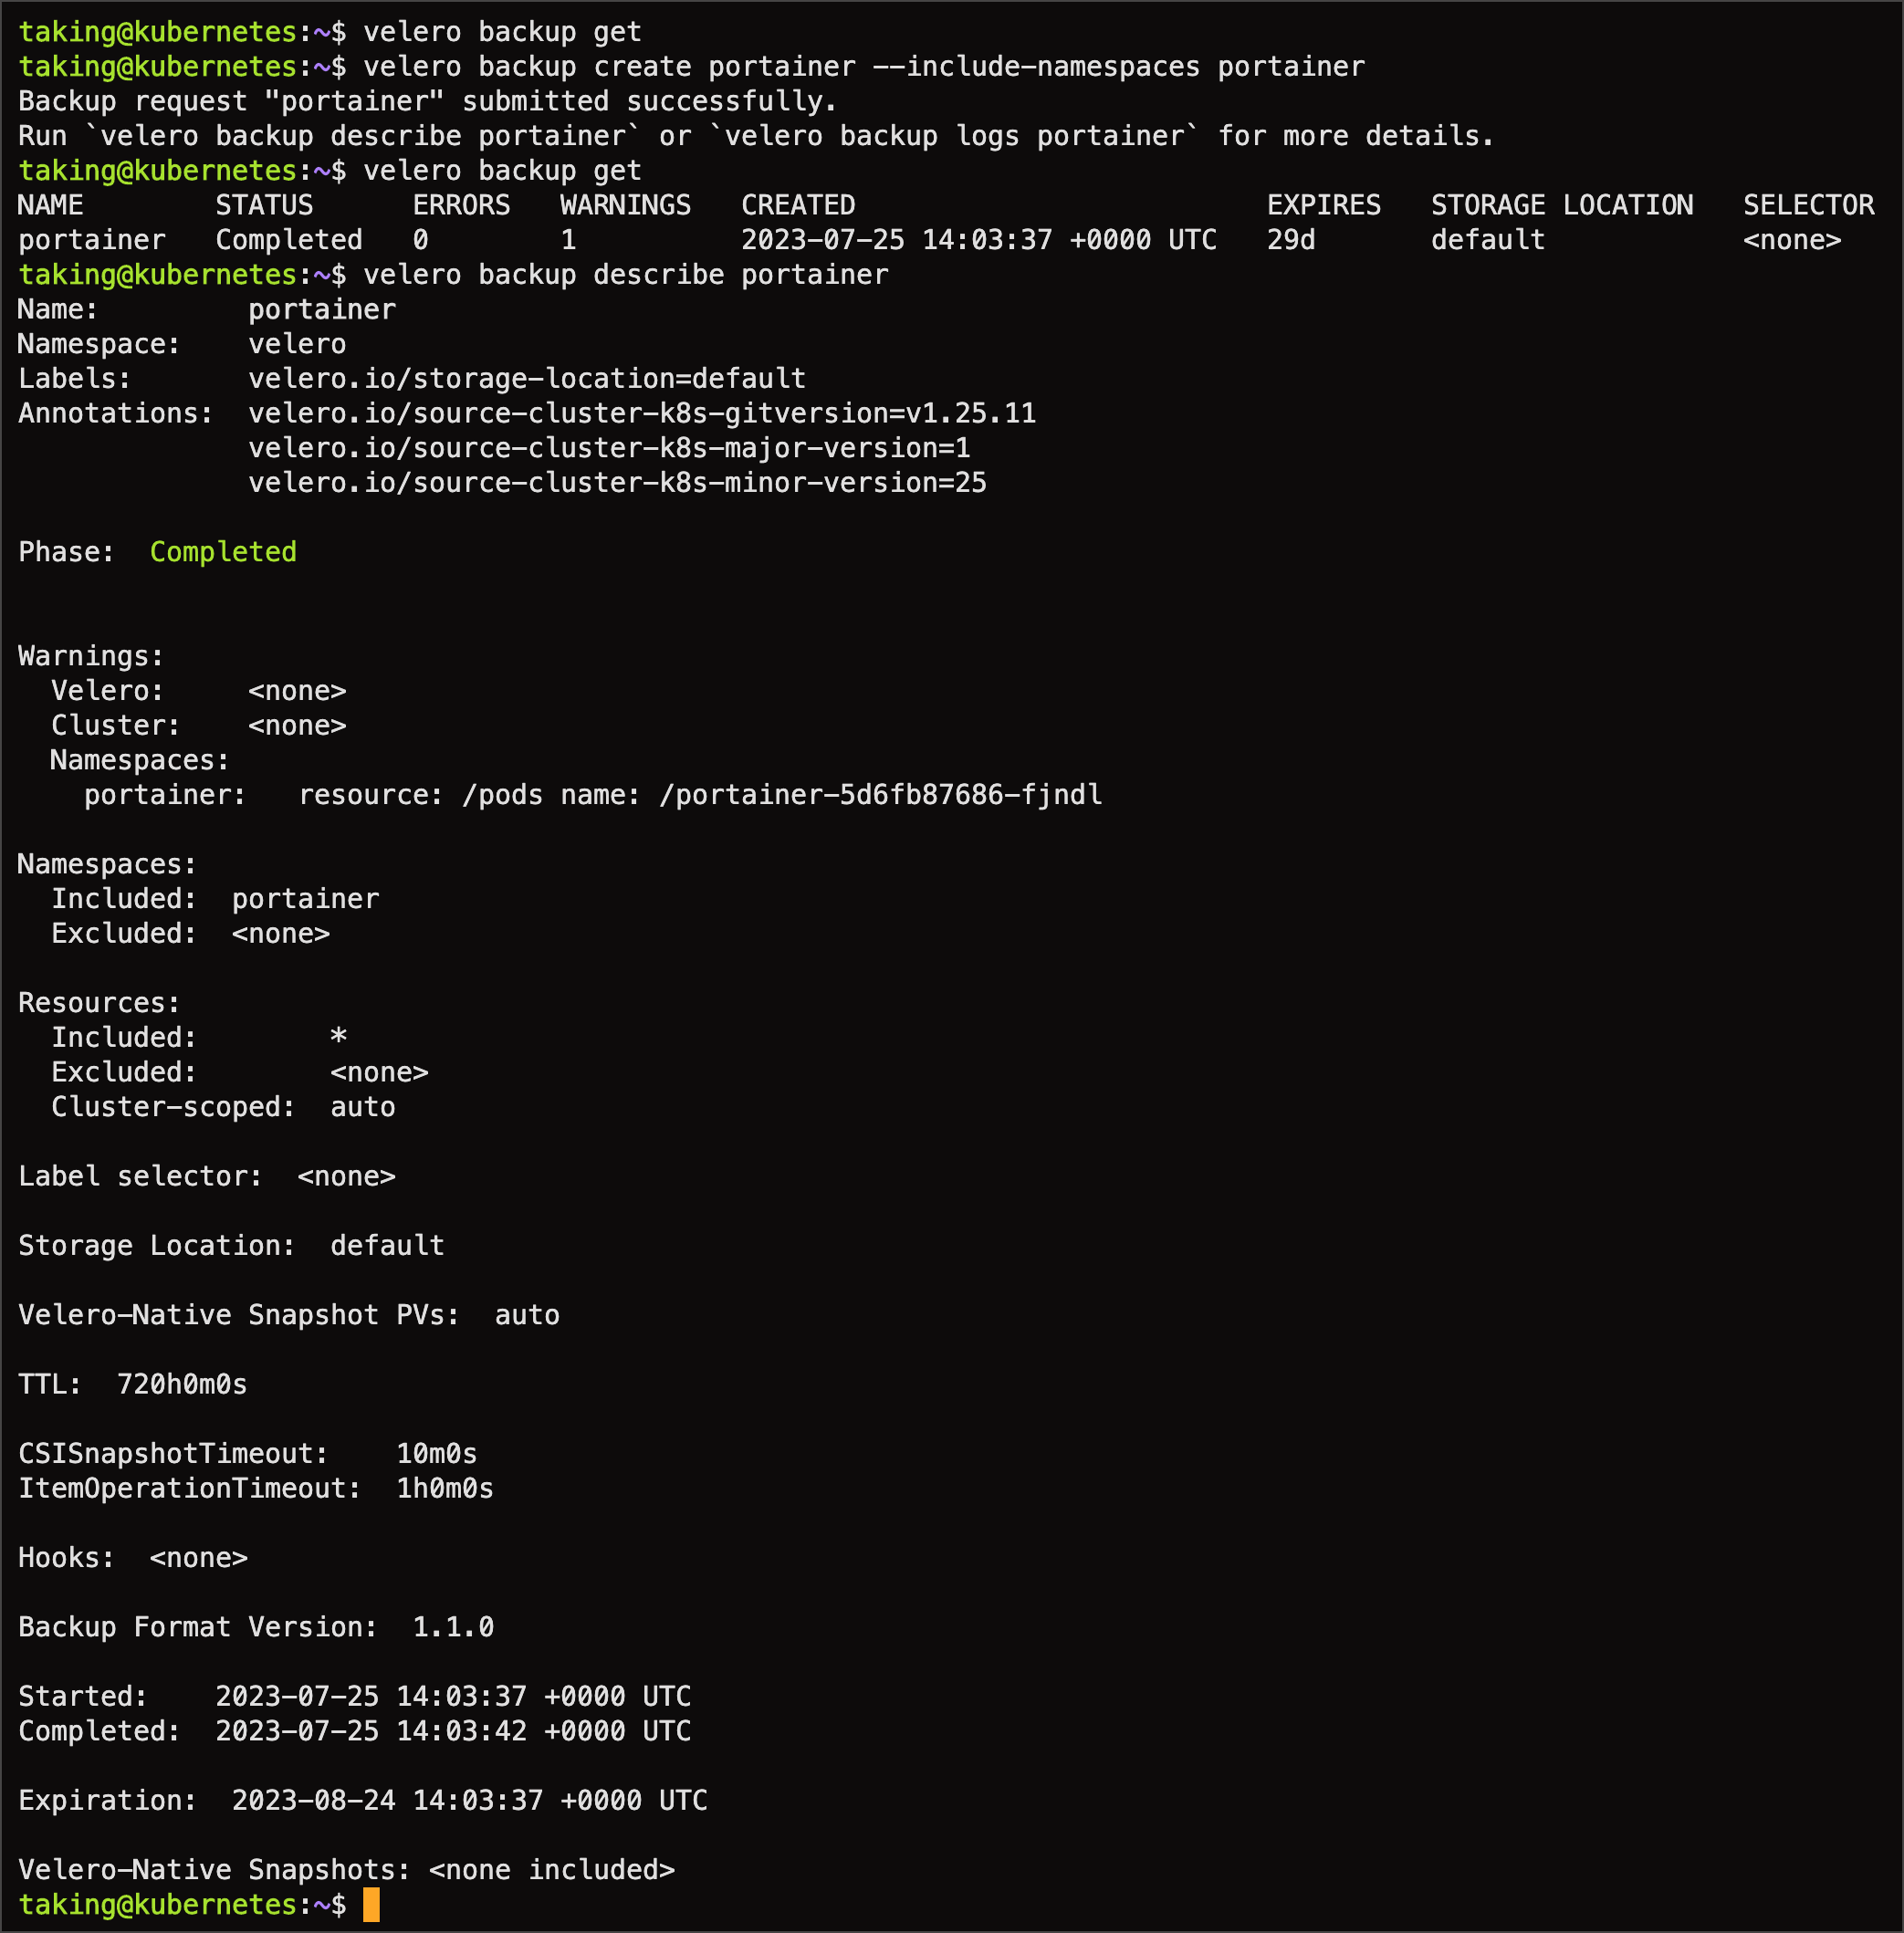
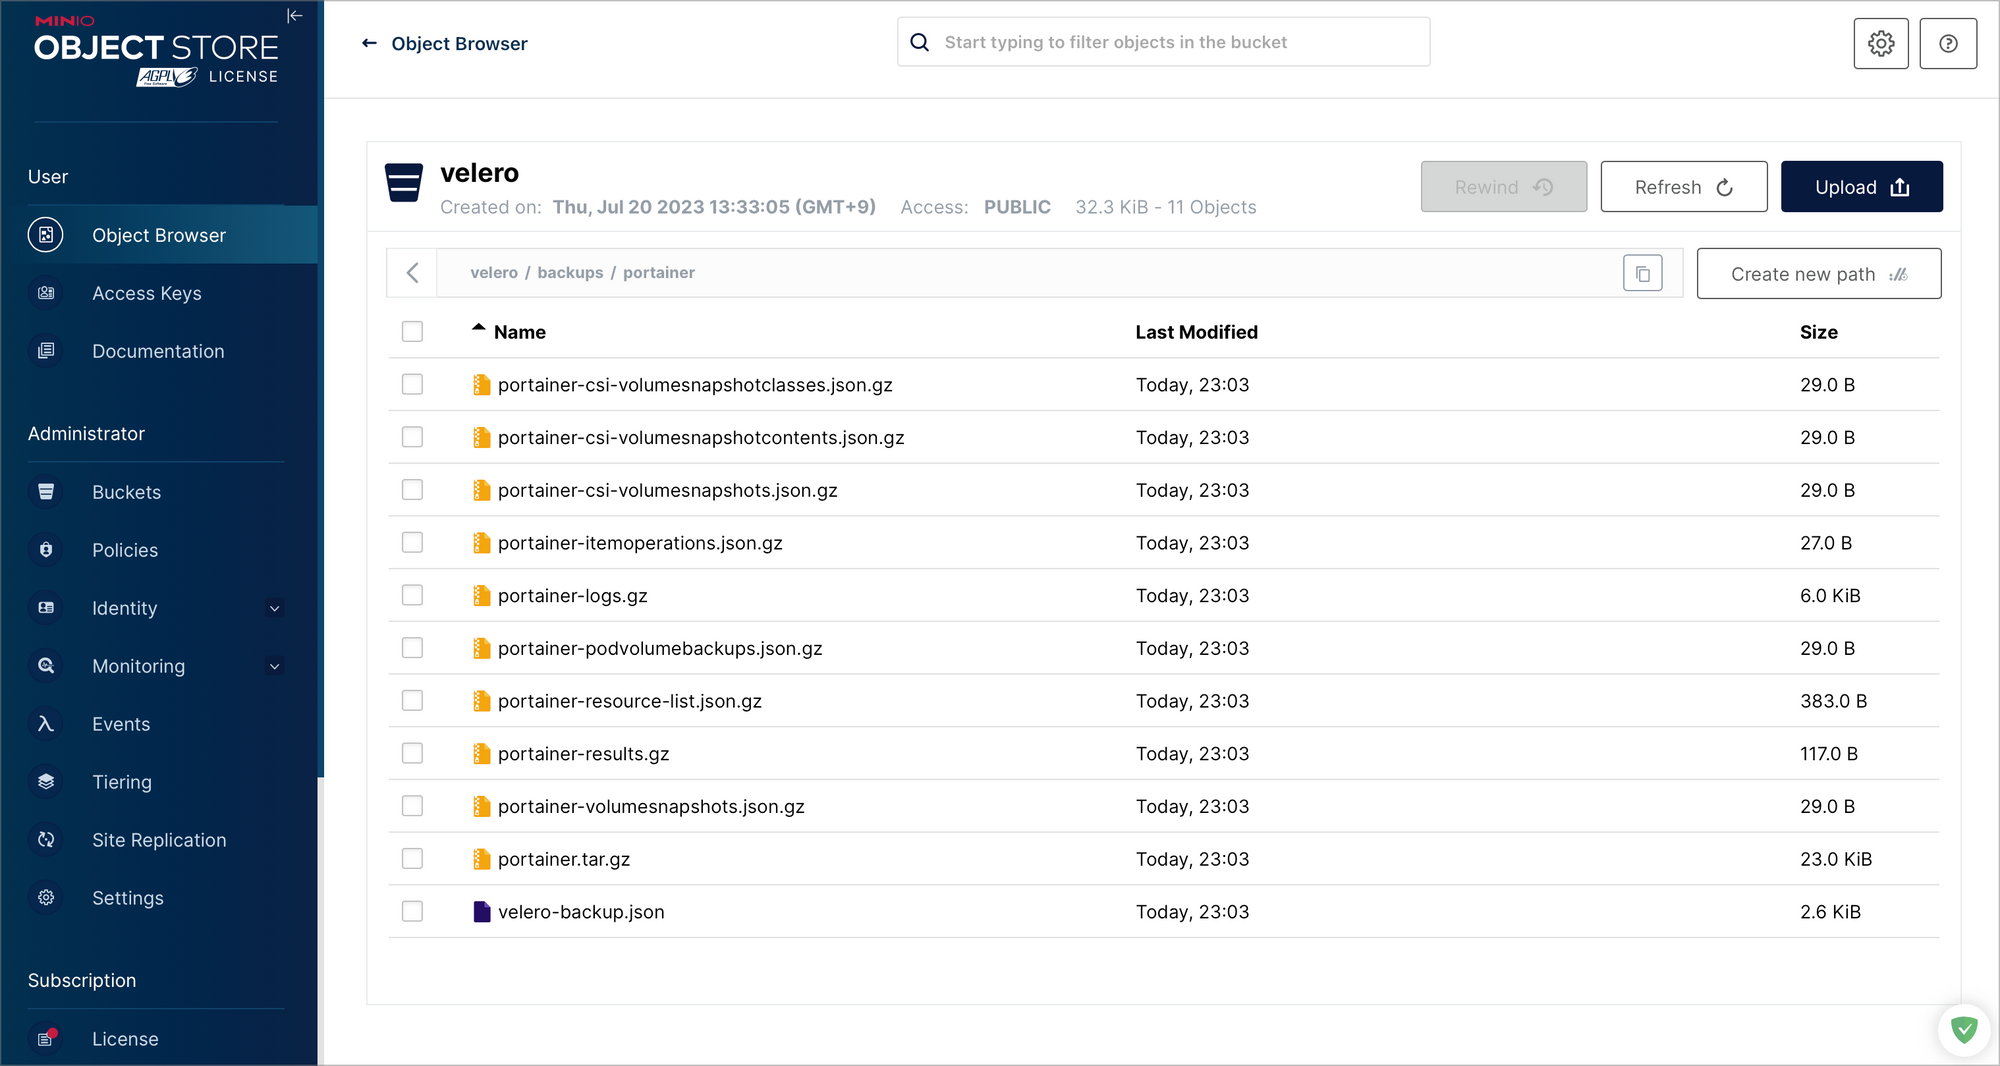
- velero 설치 시, 입력한 Object Storage로 portainer 백업이 정상적으로 이루어진걸 확인 할 수 있었다.
- nfs-subdir-external-provisioner를 사용할 땐 restic 백업이 활성화되었는데, hostPath의 경우에는 Restic 백업이 안되는 것을 확인할 수 있었다.
- 하지만, Static PV,PVC와 hostPath 지정했기 때문에 restic 백업은 안되도 문제 없다.
- portainer 네임스페이스 내 PV,PVC를 우선 삭제 요청하고 pod를 제거했다.
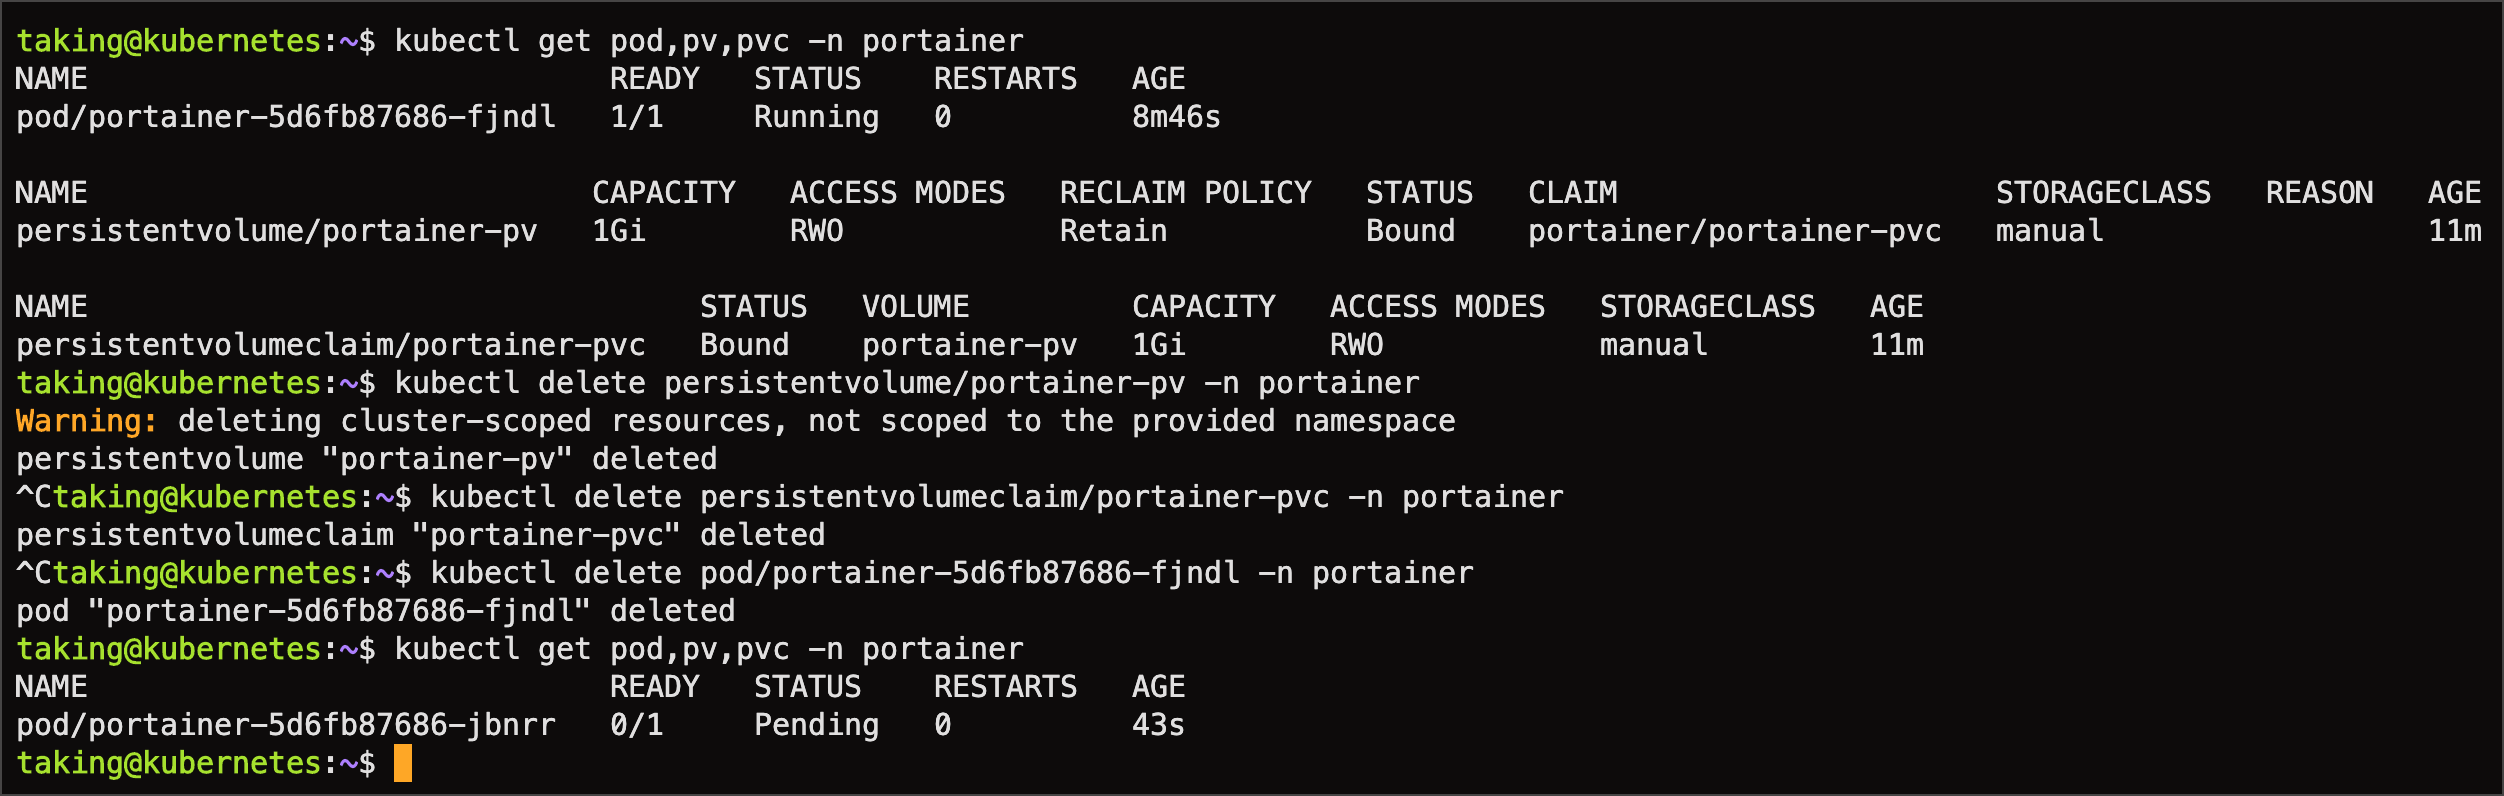
velero restore create --from-backup {backupName}명령어를 통해 restore를 요청한다.
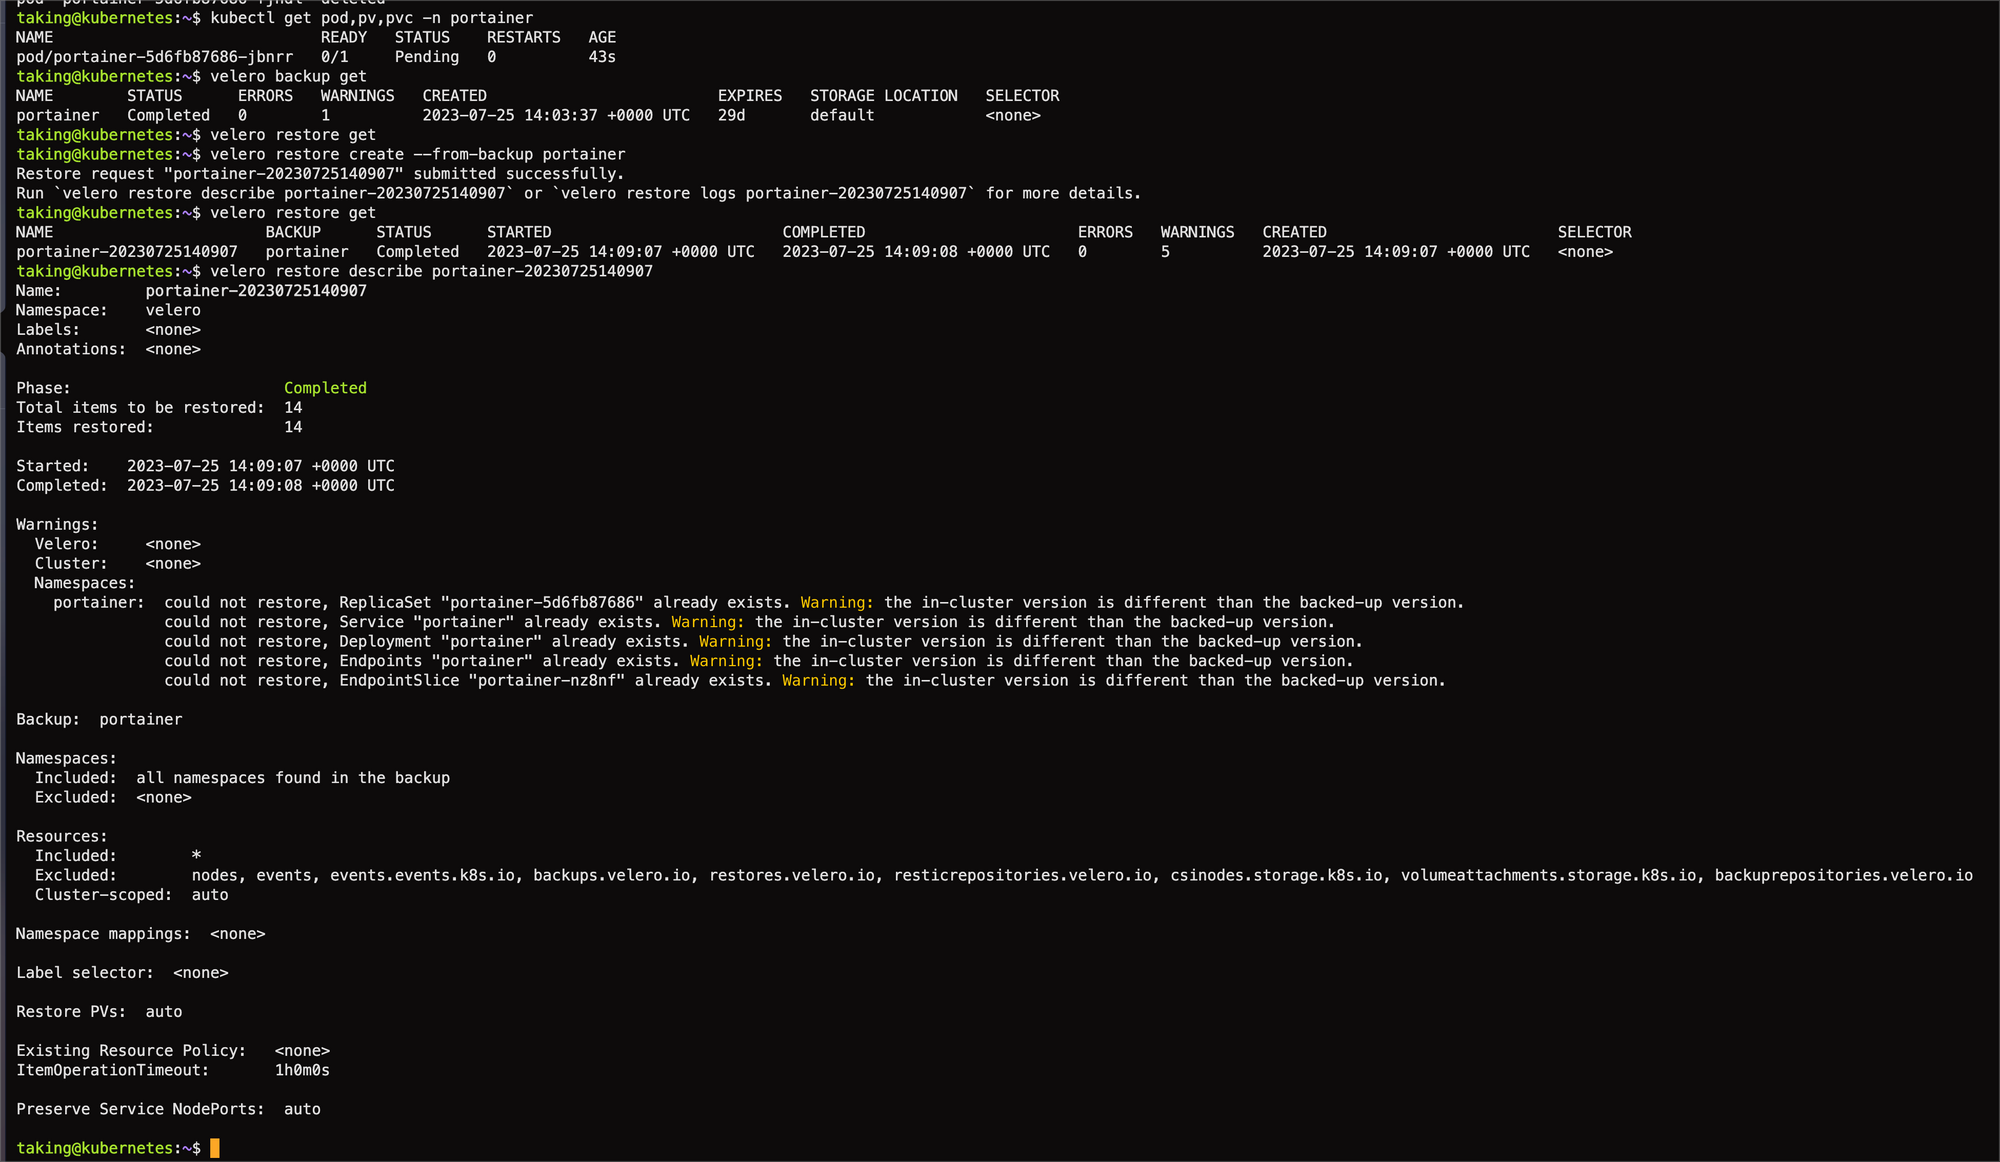
- 정상적으로 velero restore 를 통해 pv,pvc가 복구된 것을 볼 수 있다. 사실 pv,pvc 이외에 configmaps, secrets 등 또한 같이 백업 및 복구된다. 자세한건 Documents를 확인 바람
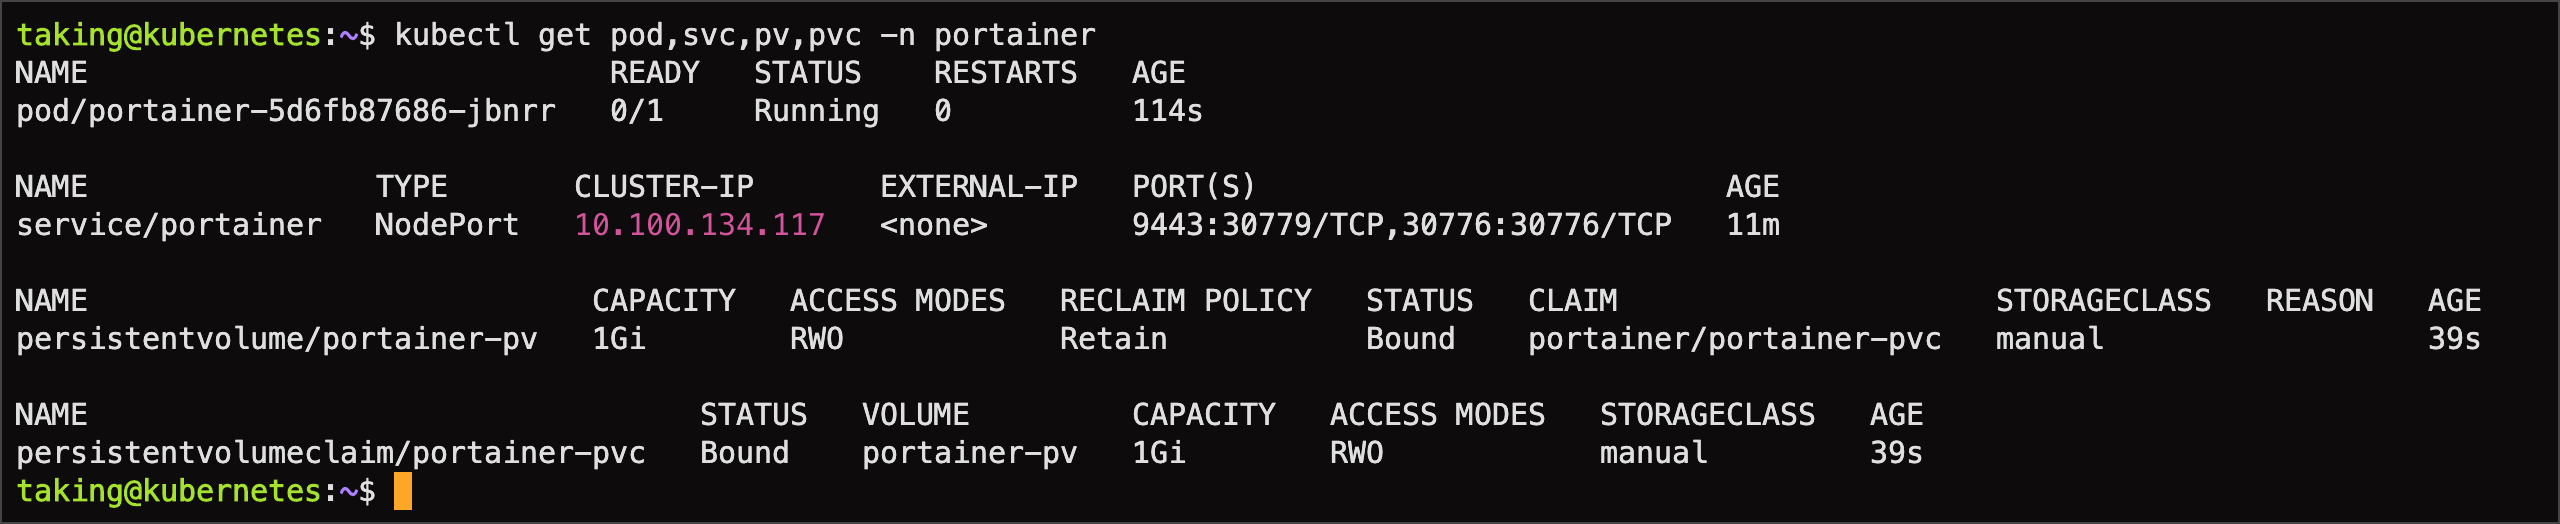
- 기존에 생성한 계정으로 접속할 수 있다.
2.3. Static Provisioning with NFS (예정)
NAME=portainer
NFS_ADDR=192.168.0.100
NFS_PATH=/volume/1TB_NVME/kubernetes/portainer-pvc
STORAGE_ClASS=manual
STORAGE_CAPACITY=1Gi

cat << EOF | kubectl apply -f -
---
# namespace
---
apiVersion: v1
kind: Namespace
metadata:
  labels:
    component: ${NAME}
    kubernetes.io/metadata.name: ${NAME}
  name: ${NAME}
---
# nfs pv,pvc
---
apiVersion: v1
kind: PersistentVolume
metadata:
  name: ${NAME}-pv
  namespace: portainer
spec:
  accessModes:
    - ReadWriteMany
  capacity:
    storage: ${STORAGE_CAPACITY}
  volumeMode: Filesystem
  persistentVolumeReclaimPolicy: Retain
  nfs:
    server: ${NFS_ADDR}
    path: ${NFS_PATH}
  storageClassName: ${STORAGE_ClASS}
---
apiVersion: v1
kind: PersistentVolumeClaim
metadata:
  name: ${NAME}-pvc
  namespace: portainer
spec:
  accessModes:
    - ReadWriteMany
  resources:
    requests:
      storage: ${STORAGE_CAPACITY}
  storageClassName: ${STORAGE_ClASS}
  volumeMode: Filesystem
  volumeName: ${NAME}-pv
EOF
helm upgrade portainer portainer/portainer \
--install \
--create-namespace \
--namespace portainer \
--set service.type=NodePort \
--set enterpriseEdition.enabled=true \
--set persistence.existingClaim=portainer-pvc \
--set tls.force=true2.4. local-path-provisioner (보류)
- local-path-provisioner는 nfs-subdir-external-provisioner와 다르게 VolumeBindingMode가 설정이 가능하다.
- 아직 테스트 전이라 nfs와 동일하게 randomly uuid로 인해 동일한 문제로 진행안될 것으로 예상되어 보류한다.
- Kubernetes 의 Local Volume Provisioner 은 현재 Dynamic Provisioning 을 지원하지 않는다. local-path-provisioner 에선 지원하나 Volume Capacity 제한 기능이 현재 지원하지 않는다.
2.5. rook ceph (예정)
- 가장 마지막 보루였다. rook ceph은 생각보다 많은 자원을 요하기 때문에 rook ceph 전에 해결보고 싶었다.

댓글